


Now, I've seen similar furniture make overs done occasionally around the internet but had never done anything like either of these projects myself so I started not knowing how long it would take or how they would come out. I figured everything seemed pretty easy and pretty quick so I would just see what happened and it turned out that I finished 2 projects in 1 week! By myself, 2 projects, 1 week, never having done a single furniture make over before, there may be a few spots that aren't exactly perfect but I have to say, I think they came out pretty good!
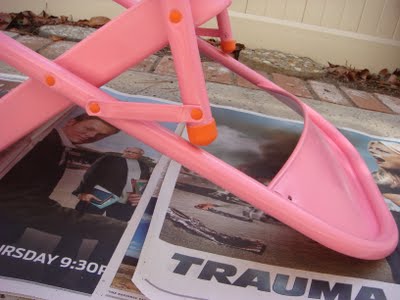
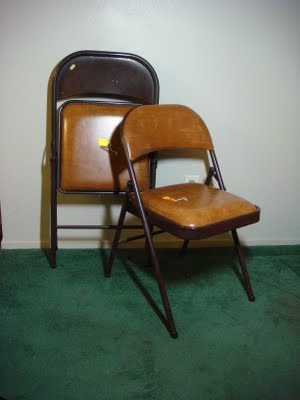 Worse than the cubicle inspired chairs! BUT they were only $4 each! On sale from $7, why they were on sale, I dont know, could it be the ugly brown vinyl? The 3" rip in one of the seat covers? The piles of dirt around the corners of the seat? I'm not sure but they were both stable, the foam still in good condition, had screws to remove the cushions and I had already decided to remove and recover them so the vinyl, rip and unreachable dirt, no big deal! I knew I wouldnt be able to redo them right away and I only "someday" needed them but I couldnt resist.

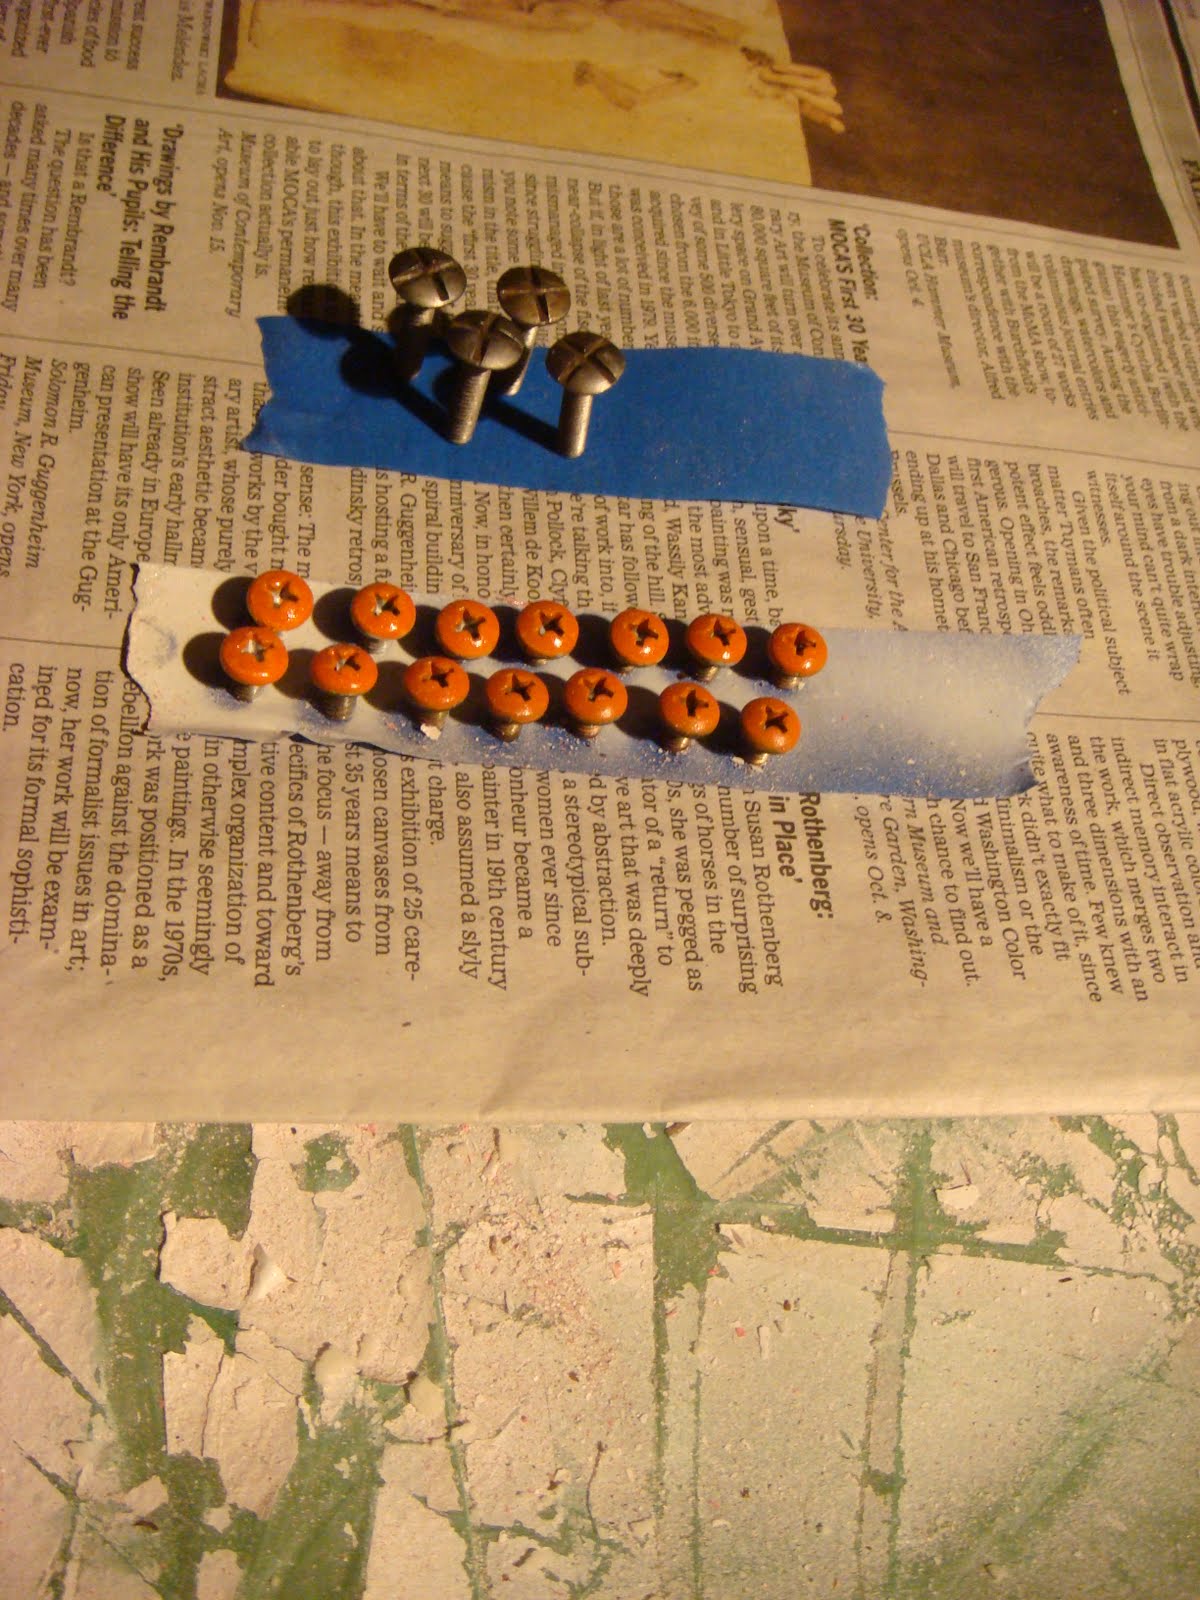
I liked the orange and pink combo and wanted to paint the screws also since a few of them would show on the back. But they needed to be primed... with the spray primer! The spray would have knocked them over and holding them would have primed my entire hand but luckily I came up with, what I thought was, another great tape idea (the other being exacto blade circles on a cutting mat!) I stuck the the screws to a piece of tape to keep them upright while spraying. (I'm sure others have used this same idea or had the same problem in the past, dont forget to share tips & stories in the comments!)
So here we are, project 1, the folding chairs...
I had been thinking about someday needing more folding chairs but the ones I had seen available in big box stores were either good looking & unstable or stable & covered in black or tan fabric reminiscent of an office cubicle. I thought out of these options I would probably choose the black and recover the fabric portion. Then a few days later I came accross these while looking for books at a local goodwill. (In case you dont already know, I frequent thrift store book sections for large books to make my upcycled wallets http://www.kelsodoesntdance.com/)
 Worse than the cubicle inspired chairs! BUT they were only $4 each! On sale from $7, why they were on sale, I dont know, could it be the ugly brown vinyl? The 3" rip in one of the seat covers? The piles of dirt around the corners of the seat? I'm not sure but they were both stable, the foam still in good condition, had screws to remove the cushions and I had already decided to remove and recover them so the vinyl, rip and unreachable dirt, no big deal! I knew I wouldnt be able to redo them right away and I only "someday" needed them but I couldnt resist.
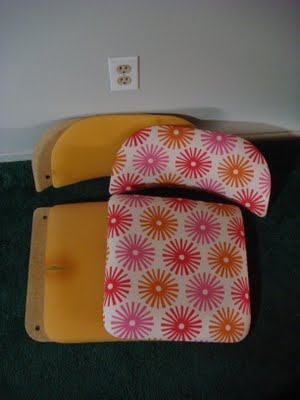
While visiting Chicago for the Renegade Craft Fair I found this home dec fabric at The Needle Shop, a great little fabric store, for its size they had a surprisingly large selection of home dec fabrics, I knew I'd regret it if I didnt get the chair fabric here. There were several good ones but I choose this Jessica Jones for J. Caroline fabic from the Amusement Park Collection.
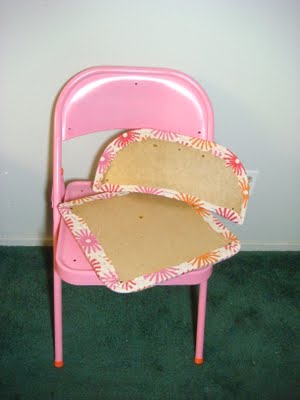
I unscrewed the cushions, removed the vinyl and staples and was left with the foam and wooden base (theres a little discoloration in the foam where the vinyl was ripped but it seems in ok condition.)

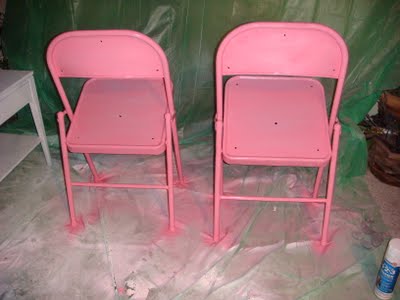
I was lucky enough to find a pink spray paint that was a pretty close match to the fabric (I dont like to use spray paint but I dont think a brush on would have worked for this project.) I cleaned the metal and used a spray primer followed by the pink spray paint. I bought 1 can of each and had to go back for a 2nd of both. It took patience and muscle, because the chairs have so many angles then turn or flip them for another angle (no one told me spray painting was so hard!)
I thought it would look best to paint the caps another color then also realized I should paint the rivets. I first ripped small pieces of tape to go around the circles, when that took a while I tried cutting holes in the tape with an exacto blade. Some of the orange paint got a little over the lines so the rivets arent perfect(these are the best ones) but I think they're pretty good. It's amazing how that small detail makes the chairs look so much better!

When cutting the fabric I was more concerned with lining up the pattern than making it the right size. I just cut a rectangular piece knowing the extra would be hidden by the metal. I started by staple gunning the middle of each side and worked all sides of the cushion at once so the fabric would stay tight. As I went along I had to trim it a bit around the curve of the chair back and around the threaded pieces the screws went into.
I liked the orange and pink combo and wanted to paint the screws also since a few of them would show on the back. But they needed to be primed... with the spray primer! The spray would have knocked them over and holding them would have primed my entire hand but luckily I came up with, what I thought was, another great tape idea (the other being exacto blade circles on a cutting mat!) I stuck the the screws to a piece of tape to keep them upright while spraying. (I'm sure others have used this same idea or had the same problem in the past, dont forget to share tips & stories in the comments!)
I scotch guarded the cushions and once everything was dry screwed them back on to the metal base!
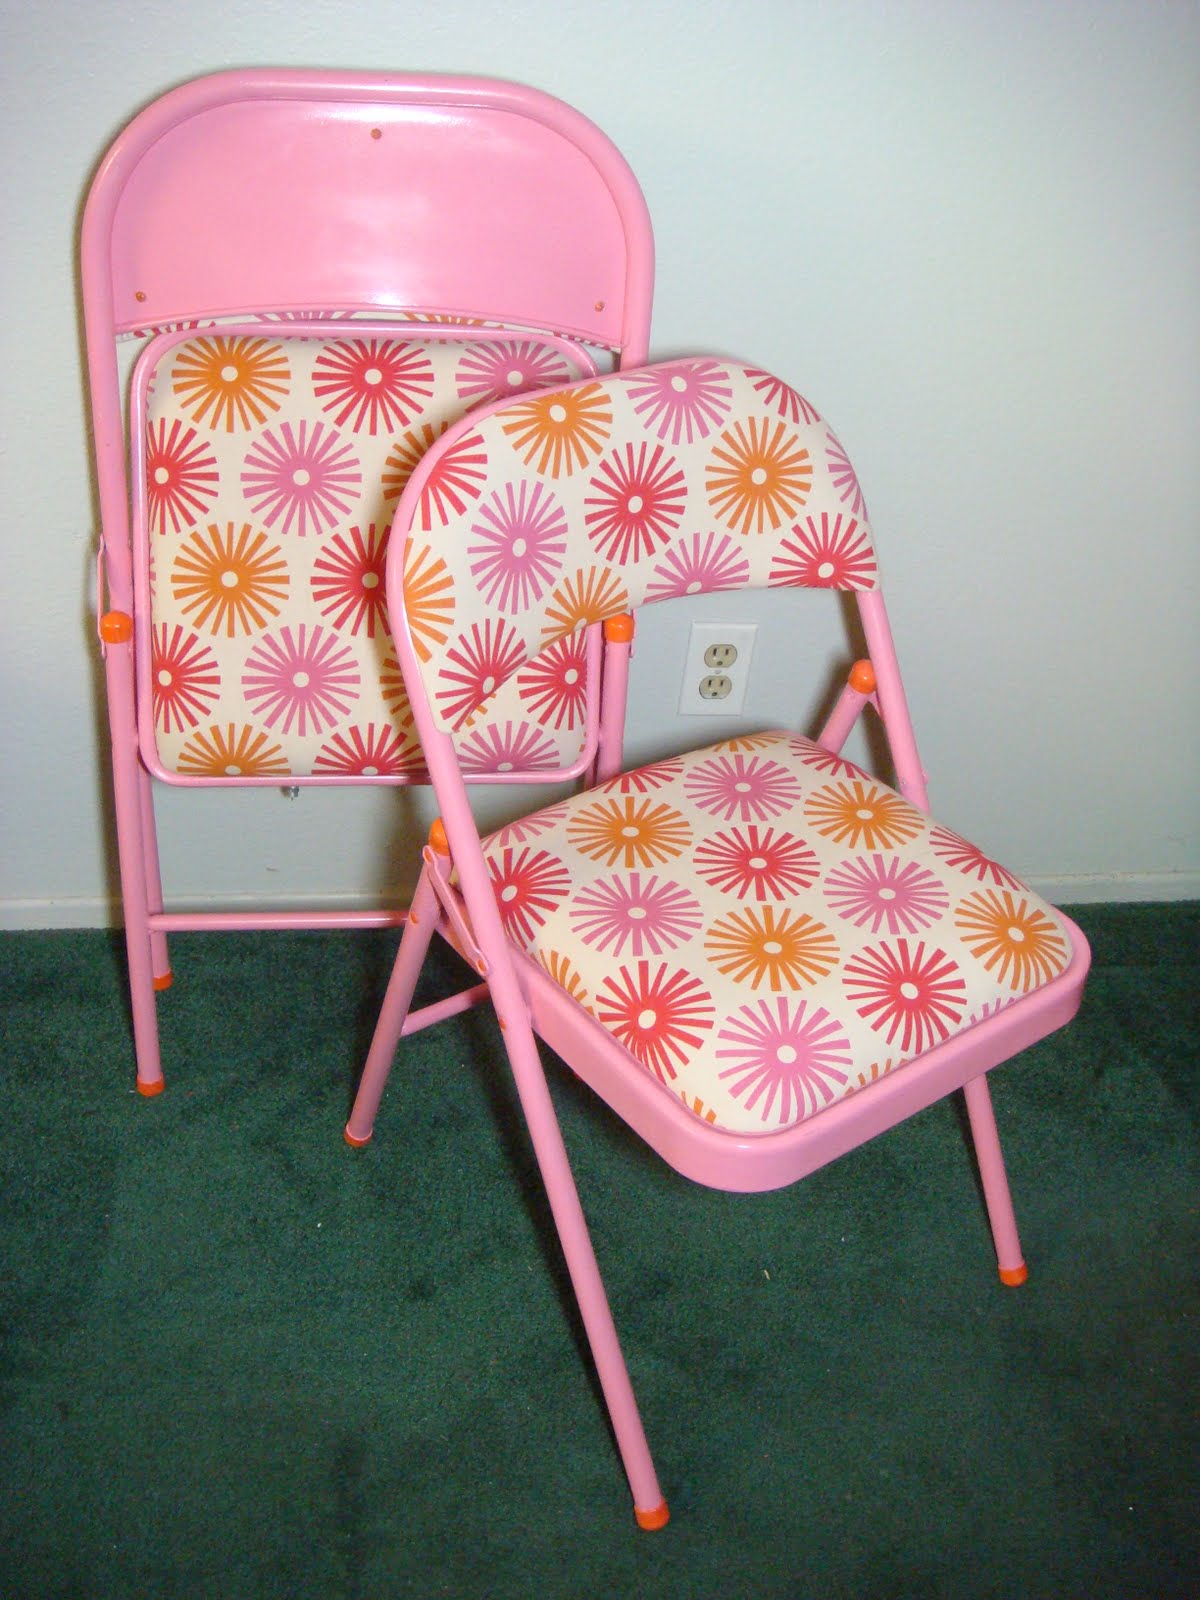
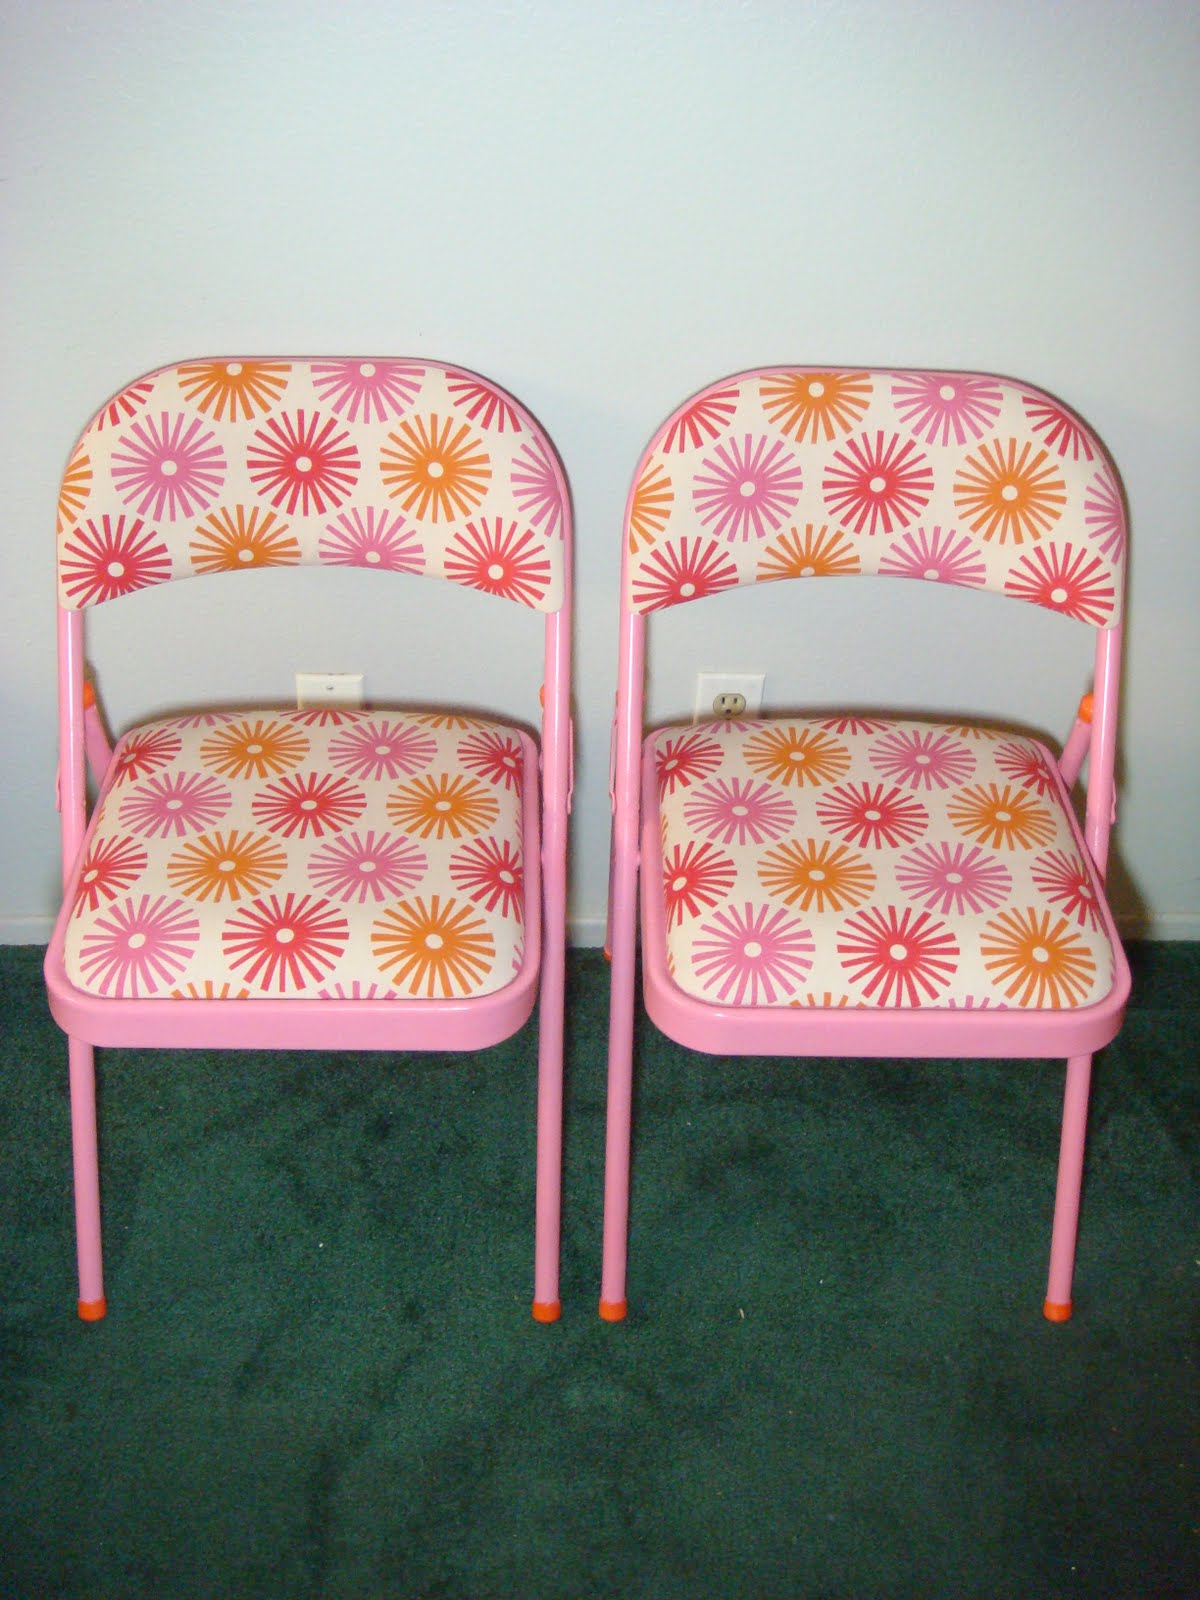
Thats it, the folding chair make over! Stay tuned for project 2 - the fabric decoupaged side table.
-Kelso of Kelso Doesnt Dance
9.22.2009 :: long beach craft mafia dye party on oc weekly!
don't miss our post on oc weekly this week! long beach craft mafia got together to test out some dye products from tulip and have an awesome contest to enter!
check out the article and enter the giveaway here.
9.06.2009 :: we're taking applications!
hey folks, if you missed our meet n greet last week don't fret - you still have a chance to put in an application for membership to the long beach craft mafia!
all the info you'll need is over on our join page and applications are only accepted through september 18 so get crackin!
also, stay tuned for our next crafty borrachas event! we'll be getting together all you crafty peeps to go bowling, date and time to be announced soon!
all the info you'll need is over on our join page and applications are only accepted through september 18 so get crackin!
also, stay tuned for our next crafty borrachas event! we'll be getting together all you crafty peeps to go bowling, date and time to be announced soon!
Labels: members
8.27.2009 :: kickin ass and takin names! (and new members!)
do you have a indie craft business? are you local to the long beach area? you should think about joining the long beach craft mafia! we'll be having a meet n greet wednesday, september 2 at 7pm and you should be there if you're interested in joining!
what's gonna go down? mainly, you'll get to meet us and decide if you like hanging out with us. you can ask us anything you like, especially if you've got questions on what to expect from your membership and things like that. and we're workin out the details, but you'll most likely receive a free tote bag screenprinted with our faboo logo!
what should you bring? just your merry selves, a couple of dollars if you'd like to have a beer or twelve with us, and maybe a show and tell item or two!
while we're definitely a the more the merrier type of group, there are some guidelines to new membership:
-you must have a indie craft business or be in the process of starting one.
-you must live in the long beach area, and if you don't you must be willing to drive to long beach for meetings and get-togethers.
-to become a member you must fill out our application and submit pics of your work, which will then be reviewed by our current members before deciding if you're mafia material. attendance at our meet n greet isn't mandatory, but it's a really good idea so see ya there!
long beach craft mafia meet n greet night
at que sera
1923 east 7th street
long beach, ca 90813
wednesday, september 2, 2009
7pm

Labels: crafty borrachas, members
8.22.2009 :: mini market on sunday!
hey folks!
hearts and laserbeams, leatherette heart and crayon fawn will be selling at sunday's mini market at urban outfitters' space 15 twenty. sunday, 10am - 4pm, it's free, and it's close to the hollywood farmers market! get your grocery shoppin AND your indie craft on all in one place!!!
more info can be found here
10.06.2008 :: craft show opportunity! check it out!
we just heard about this recently, check it out! looks like it'll be a great opportunity, and they would love for more artsy crafty types to join in the fun!
*****
UNIQUE LOS ANGELES will run for two days, Dec 13 and 14, and have a special VIP party and preview the evening of the 12th. The almost 94,000 square foot venue (which looks out across the city!) will feature over 225 booths, making it the first 'large-scale' LA indie consumer event. It's going to be awesome, and the support and buzz around it already has been really great - so far Pabst, Etsy and Chronicle Books are sponsors and many people are getting in touch to partner with the event. Please visit www.uniquelosangeles.com/vendor.html to check out the Vendor page.
craft mafia members get an early bird special: apply by this Friday at midnight (Oct 10th) and receive a $30 refund when accepted. hooray!
Labels: shows
9.26.2008 :: long beach craft mafia in this week's oc weekly!

(photo by jennie warren of oc weekly)
this is so exciting folks!
if you pick up this week's oc weekly the cover story is an interview with the long beach craft mafia! check out our fantastic covergirl liz of leatherette heart! tyra banks eat your heart out, we found long beach's next top model!
vickie chang of the oc weekly interviewed all five active members, including liz abbot of leatherette heart, kelsey cooper of kelso doesn't dance, tamara zelinski of crayon fawn, lexi lee of little bit, and steph calvert of hearts and laserbeams.

(photo by jennie warren of oc weekly)
you should totally pick up a copy of the magazine, it's available pretty much everywhere all throughout orange county and it's FREE! if you're out of the area and would like one mailed, email me at heartsandlaserbeams@gmail.com and i'll get one to ya! or you can take a gander online here!
thanks for lookin, thanks for supporting handmade stuff by indie artists, and have a great weekend!
9.23.2008 :: long beach craft mafia in this week's oc weekly!
omg guys! so exciting, oc weekly is doing a cover story on the long beach craft mafia! the story comes out in this thursday's issue, so don't forget to pick one up!
also, since i'm telling you what to do, don't forget my painting show coming clean: secrets and stories from catholic school is up through september 30 at the kids are alright in long beach!
also, since i'm telling you what to do, don't forget my painting show coming clean: secrets and stories from catholic school is up through september 30 at the kids are alright in long beach!
8.25.2008 :: join the long beach craft mafia!
Applications for the Long Beach Craft Mafia are now being accepted year-round!
first, take a look at our about page to learn more about who we are and what we do! you'll also want to read up on our policies to make sure you're up for the challenge.
still want in to the mafia? then download our application! fill it out and send the following materials to longbeachcraftmafia@gmail.com:
* completed application
* 3 photos of your work
* brief bio about yourself (150 words or less. this will be used on our home page if you're accepted!)
* bio picture (must be 200px high by 150px wide, 75 dpi. need help with this? email steph calvert at heartsandlaserbeams@gmail.com.)
that's it! please submit all application materials at the same time; incomplete applications will be sent back until all materials are able to be submitted at once. once we've received your materials they will be reviewed by the group, and you should hear back on if you're approved for membership within 2 weeks. thanks so much for considering us, we look forward to hearin from ya!
8.12.2008 :: coming to the long beach area?
Long Beach offers all the amenities of a sophisticated, cosmopolitan city, while retaining the charm and tranquility of a seaside community! check out longbeachairporthotels.com for all your plannin needs!
:: hearts and laserbeams how-to #1: sisterhood of the pocketed pants!
hi folks! here's the first in a new series of tutorials i'm going to be doin', on how to transform your almost-favorite new pair of pants into your totally favorite new pair of pants by making the pockets deep enough to hold things like your cell phone! enjoy!
*****
Today we're talking pants pockets. As I said in an earlier post, one of my pet peeves is jeans pockets that are nowhere deep enough to hold things! Found some good pants recently that I couldn't pass up because they actually fit right AND weren't so low-rise my crotch was hanging out. Alas, the pockets were awful! I could put my phone in the pocket, but it always felt like it was gonna fall out and it looked weenery, something that classy ladies just aren't into. And me, I'm a super classy broad.
So here it is in detail, all you ever wanted to know about making your pants pockets deeper but were afraid to ask! (including some pics of the first pair I did that turned out a little off, resulting in THE DEEPEST PANTS POCKET EVER CREATED!!!
How to make deeper pockets for your spanky new pants!
you will need:
* new pants with pockets that aren't deep enough
* old pair of pants with pockets you like (for making the pattern)
* piece of paper big enough to draw your pocket pattern on and a pencil or pen to draw the pattern
*scissors
*needle and thread or sewing machine
* fabric – the amount and kind depends on you – if you're making massive pockets you'll need more fabric than if you're making standard sized pockets, and maybe you want to use something in a fun print! Take a look at the pockets you'll be using as a pattern, and use that as your guide on how much fabric you'll need. Remember you're making 2, and get a little bit extra so you've got room for cutting and sewing. I'd recommend a heavier cotton for the material, but lightweight quilting-type cottons would probably be fine, too, if you reinforce your seams (by sewing them twice!).
step 1: make the pocket pattern!
1. Turn your new pants (with the pockets you hate!) inside out.
2. Notice there's already some front pocket on those pants. You'll need that too-short pocket to attach the new pocket to. Hold your piece of paper so the top edge is ½" above the end of the too-short pocket. Using the edges of the original pocket as a guide, draw the edges of the pocket for as long as you'd like your pocket to be. (if you've got another pair of pants with pockets you like you can use those as a guide.) then connect the sides by drawing a curve at the bottom to match the bottom of the current too-short pocket.

3. Add ½" around the entire outline for cutting and sewing.
4. Make some marks on your pattern piece so you remember what's going where when you're cutting your fabric – check out my example here, remembering it's not to scale!

step 2: sew the new pockets!
1. Cut 2 pockets using your newly drafted pattern piece. I recommend finishing all edges so they don't get frayed and stringy in the wash. (something that's happening with the first pair of pockets I did!) there's nothing anyone hates more than a pantsleg ful of stringy pockets!
An easy way to finish the edges if you don't have a serger is to use your standard sewing machine to zigzag stitch around the edges. If you don't have a sewing machine at all how about a nice blanket stitch around the edges? If you don't have a needle and thread to do that then I have no idea what to tell ya, this is a sewing tutorial… maybe use duct tape?

2. Fold your pocket piece on the fold line and sew along the side seam. Repeat for other pocket piece.

It's just that simple! Bam! Now you've got your new pants with too-short pockets, and two pockets you're gonna add on! Pow! Lets' get to makin a connection!
step 3: sew the new pockets to the short pockets!
1. Ok take a deep breath, you're about to cut up your new pants! They should still be inside out from when you made your pattern piece. Using your scissors, you're going to cut off the very end of your too-short pocket, where it's sewn shut. Go on, try it. I'll wait.
Is it cut? Good. Okay, do the same for the other front pocket. You should now have a pair of pants with completely useless pockets, meaning they have humongous holes in em! Do not carry money in these pants til you've finished fixing the pockets! I would recommend finishing the cut edges of your too-short pockets, too, to avoid a stringy mess in the wash.

2. Take one of your pocket pieces and turn it inside out. The seam you've sewn should now be on the inside of the pocket piece. Take that piece, and insert it into your too-short pocket with the bottom of the pocket piece pointing towards the waistband of the pants. match up the open edges of the too short pocket and the new pocket piece, matching up where the fold and the seam meet.

3. Pin the edges together and sew! Use a ½" seam allowance, and a sewing machine if ya can. When I wrote this tutorial my machine was in storage, so I handstitched it with a nice strong backstitch, and it's held up beautifully in the wash.
4. Repeat for the other pocket.
5. Turn everything right side out and marvel at how awesome pockets you can actually put stuff in are!

6. Do a happy dance!
7. Send me 20 bucks!
8. Repeat steps 6 and 7 as needed.
When I first tried this out, I was working a little out of order, making the pocket pieces first using an old pair of pants as a guide, and cutting them down to fit the new pants pockets if that makes sense… which worked out fine until I forgot to cut one down, meaning it was time to revise the steps for public consumption. But I still gotta share the fruits of the labor with ya, and now without further ado, as promised, here are pics of THE LONGEST PANTS POCKET IN THE WORLD!
Ahahahahah false alarm folks, I just realized I have no idea where my digital camera's battery is… so you're gonna have to wait a bit on actual photos… sorry! but it'll make it that much awesomer when you finally see it, i swear!
*****
Today we're talking pants pockets. As I said in an earlier post, one of my pet peeves is jeans pockets that are nowhere deep enough to hold things! Found some good pants recently that I couldn't pass up because they actually fit right AND weren't so low-rise my crotch was hanging out. Alas, the pockets were awful! I could put my phone in the pocket, but it always felt like it was gonna fall out and it looked weenery, something that classy ladies just aren't into. And me, I'm a super classy broad.
So here it is in detail, all you ever wanted to know about making your pants pockets deeper but were afraid to ask! (including some pics of the first pair I did that turned out a little off, resulting in THE DEEPEST PANTS POCKET EVER CREATED!!!
How to make deeper pockets for your spanky new pants!
you will need:
* new pants with pockets that aren't deep enough
* old pair of pants with pockets you like (for making the pattern)
* piece of paper big enough to draw your pocket pattern on and a pencil or pen to draw the pattern
*scissors
*needle and thread or sewing machine
* fabric – the amount and kind depends on you – if you're making massive pockets you'll need more fabric than if you're making standard sized pockets, and maybe you want to use something in a fun print! Take a look at the pockets you'll be using as a pattern, and use that as your guide on how much fabric you'll need. Remember you're making 2, and get a little bit extra so you've got room for cutting and sewing. I'd recommend a heavier cotton for the material, but lightweight quilting-type cottons would probably be fine, too, if you reinforce your seams (by sewing them twice!).
step 1: make the pocket pattern!
1. Turn your new pants (with the pockets you hate!) inside out.
2. Notice there's already some front pocket on those pants. You'll need that too-short pocket to attach the new pocket to. Hold your piece of paper so the top edge is ½" above the end of the too-short pocket. Using the edges of the original pocket as a guide, draw the edges of the pocket for as long as you'd like your pocket to be. (if you've got another pair of pants with pockets you like you can use those as a guide.) then connect the sides by drawing a curve at the bottom to match the bottom of the current too-short pocket.
3. Add ½" around the entire outline for cutting and sewing.
4. Make some marks on your pattern piece so you remember what's going where when you're cutting your fabric – check out my example here, remembering it's not to scale!
step 2: sew the new pockets!
1. Cut 2 pockets using your newly drafted pattern piece. I recommend finishing all edges so they don't get frayed and stringy in the wash. (something that's happening with the first pair of pockets I did!) there's nothing anyone hates more than a pantsleg ful of stringy pockets!
An easy way to finish the edges if you don't have a serger is to use your standard sewing machine to zigzag stitch around the edges. If you don't have a sewing machine at all how about a nice blanket stitch around the edges? If you don't have a needle and thread to do that then I have no idea what to tell ya, this is a sewing tutorial… maybe use duct tape?
2. Fold your pocket piece on the fold line and sew along the side seam. Repeat for other pocket piece.
It's just that simple! Bam! Now you've got your new pants with too-short pockets, and two pockets you're gonna add on! Pow! Lets' get to makin a connection!
step 3: sew the new pockets to the short pockets!
1. Ok take a deep breath, you're about to cut up your new pants! They should still be inside out from when you made your pattern piece. Using your scissors, you're going to cut off the very end of your too-short pocket, where it's sewn shut. Go on, try it. I'll wait.
Is it cut? Good. Okay, do the same for the other front pocket. You should now have a pair of pants with completely useless pockets, meaning they have humongous holes in em! Do not carry money in these pants til you've finished fixing the pockets! I would recommend finishing the cut edges of your too-short pockets, too, to avoid a stringy mess in the wash.
2. Take one of your pocket pieces and turn it inside out. The seam you've sewn should now be on the inside of the pocket piece. Take that piece, and insert it into your too-short pocket with the bottom of the pocket piece pointing towards the waistband of the pants. match up the open edges of the too short pocket and the new pocket piece, matching up where the fold and the seam meet.
3. Pin the edges together and sew! Use a ½" seam allowance, and a sewing machine if ya can. When I wrote this tutorial my machine was in storage, so I handstitched it with a nice strong backstitch, and it's held up beautifully in the wash.
4. Repeat for the other pocket.
5. Turn everything right side out and marvel at how awesome pockets you can actually put stuff in are!
6. Do a happy dance!
7. Send me 20 bucks!
8. Repeat steps 6 and 7 as needed.
When I first tried this out, I was working a little out of order, making the pocket pieces first using an old pair of pants as a guide, and cutting them down to fit the new pants pockets if that makes sense… which worked out fine until I forgot to cut one down, meaning it was time to revise the steps for public consumption. But I still gotta share the fruits of the labor with ya, and now without further ado, as promised, here are pics of THE LONGEST PANTS POCKET IN THE WORLD!
Ahahahahah false alarm folks, I just realized I have no idea where my digital camera's battery is… so you're gonna have to wait a bit on actual photos… sorry! but it'll make it that much awesomer when you finally see it, i swear!